5 Capture One Quick Tips
If you’re a Capture One user there are lots of little things that you may or may not be aware of that can actually help your workflow, but are too small to put in an article all by themselves! So, I’ve collected a few of these quick tips into a single post. Depending on your experience level, you may have come across some or all of these before, but for beginners or Lightroom switchers, I hope you find some of these useful.
Hold down option key when starting up to select the catalogue (or create a new one)
If you’re coming from Lightroom, you may be familiar with this trick. Holding down the option key lets you select (or create a new) library in Lightroom, and the same trick works in Capture One with catalogues. Simply hold down option on the Mac or alt on PC as Capture One starts to bring up a dialog where you can select an existing catalogue or create a new one.

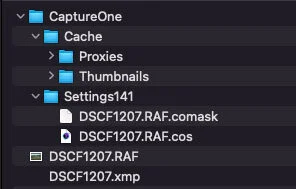
How to save metadata to a sidecar file.
If you are working with image files in Capture One and want to save the metadata to those files so you can read them in another application, there are two ways to do this.
The first is to turn on metadata syncing in the preferences. You can find this in the Image tab of the preferences and it’s called “Autosync Sidecar XMP”. I suggest not using this method, as it can end up constantly trying to sync and it can also bring up an intrusive dialog box every time it does this. I tried this feature a few times but ended up turning it off. But, if you want to constantly sync your metadata, this is the place to do it.

The alternative way is to just do it when you need to. Simply select the images you want to save metadata for and from the image menu choose “Sync Metadata”. Just be aware that this goes both ways, and it will load changes from the sidecar file if any exist.
I have seen complaints from people about Capture One’s metadata not being compatible with other software, but for basics like ratings and labels it should work fine.
How to Apply Styles to a layer
If you’re using the pro version of Capture One then one of the best features of the software is its layers system. If you use styles, you can actually apply styles to a layer rather than to the base adjustments. This means you can use styles in conjunction with the various masking options.
To apply styles to a layer, simply go to the Styles and Presets tool and locate the style you want to apply. Now right click (or control click) on the style and choose “Apply to new layer”. If you want to apply a style to an existing layer, make sure you’re on the layer first and choose “Apply to Selected Layer” when you right click on the image. Just make sure that the layer has a mask on it and doesn’t have an empty mask.
You can also do this from within the layers panel, but you will need to create the layer first. Once you do, right click on the layer and choose: “Apply Adjustments from…” And navigate to the style you want to apply.
One thing to be aware of is that not all styles will work on layers, as some adjustments aren’t available on Layers.
How to control the overall amount of a style applied, and how to blend styles.
Speaking of styles and layers, there is one big advantage to applying styles to a layer is that you can fade them out. If you apply a style to a layer, you can use the overall opacity slider for that layer as a “volume” adjustment for the overall style. If you like a style but wish it was just a little bit less, then apply it to a layer, and then use the opacity slider to dial it back a bit.
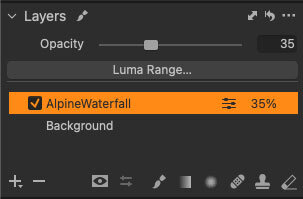
Another use of this is that you can blend multiple styles this way. Simply create a second layer and apply a different style to that. What’s more, you can use luminance masks to apply styles to different parts of an image. For example, have one style on the shadows and a different style on the highlights. Or you can also blend them with more traditional masks, such as the gradient tool.
Send an image to another computer or user with the adjustments stored non-destructively.
If you’re coming from Lightroom, you may be familiar with the way of sending an image as a DNG or including the adjustments in the XMP file in order to send a raw file with the adjustments stored non destructively. Unfortunately, DNGs don’t really work very well with Capture One, and some formats aren’t supported at all, but there are two other solutions.

The first is to export the file as an original and include the adjustments. This will create a separate folder with the adjustments stored in proprietary capture one files. To do this, select an image and choose: Export > Originals
Now, when the dialog pops up, make sure to select “Include Adjustments”. This will export the image with the necessary data in separate files. You can now re-import this to Capture One (Make sure to have “Include Adjustments” ticked in the import dialog.
The second method is to export your originals as an EIP. This is Capture One’s own format, and it works like a DNG (sort of). ItT’s basically the same as the previous method, only in a single file.
To save as an EIP, again, go to Export > Originals, and this time choose “Pack as EIP”. This will save the image out as an EIUP file which you can then import into another copy of Capture One, with edits kept non-destructive. If you’re using a session, the command is slightly different. From the Image menu choose “Pack as EIP”. You can also extract the RAW file by choosing “Unpack from EIP”.
Note though, that EIP only works with RAW files, and only with the Pro version of Capture One (not express).
Conclusion
I hope you have found this little tips useful. If I think of any more I will share them in a future version of this, and stay tuned for a video version of this article too.
Help Support the Blog
Try or Buy Capture One
If you don’t already have Capture One, you can download a 30 day trial now from the company’s website. If you do go to buy it, Capture One Pro is available in both subscription and perpetual licences available, in versions for all cameras, Fuji specific , Sony specific or Nikon specific. The Fuji, Sony and Nikon versions only open raw files from cameras of the respective manufacturers, but other than that, they are identical to the full version.
If you buy through the above links, we get a small commission, which helps run this site.
Check out my Capture One Style Packs
If you’re looking for some Film Effect, or black and White style packs for Capture One, check out my Capture One styles on my Gum Road Store.
Patreon
If you like what you see here and you find this useful, then you can help support this blog and help me keep making great content like this by supporting me on Patreon for as little as $1 a month. There are a number of options available with different rewards, such as behind the scenes content, special Patreon only videos and more. Check out my Patreon Page for more details, and a big thanks to everyone already supporting this blog on Patreon.
Buy me a coffee!
If you’d rather not use Patreon, but still want to say thanks or help, then you can feed my caffeine habit and buy me a coffee via PayPal with a one off donation to my PayPal tip jar.
Join our Facebook Group
If you want to discuss anything you’ve read here on my website, or saw on my youtube channel, or if you want to share images you’ve created using any of my techniques or presets, then I’ve started a new Facebook Group just for that.
Note that this post contains paid affiliate links. We get a small commission for purchases made through these links, which helps run this site.