How To Customise Fuji Film Simulation Profiles in Lightroom
If you’re a Fuji shooter, you shoot RAW and use Lightroom Classic, then you probably regularly use the Fuji Film simulation colour profiles when processing your images. However, what if you want to customise those profiles? What if you’re not 100% happy with the colour balance for example, or you’d like to match some customisation options that you’ve set in-camera. Well, it’s actually easy enough to create your own custom versions of these colour profiles and in this video I’ll show you how!
Basically the process involves applying the profile to an image that you want to tweak and then using Photoshop to save those tweaks as a colour profile.
When tweaking the settings for this you want to make sure you’re only doing small tweaks. You also want to avoid adjusting things like exposure and white balance. The reason is that you want the resulting profile to work with multiple images, so if you tweak settings too much it might not work as well on a variety of images. That’s why it’s always best to keep the changes simple for this kind of thing.
In the video I started with classic neg and then used the colour grading tool to tweak the colours, then added a little tone curve bump to the brightness and used to create my own custom version of Classic Neg.
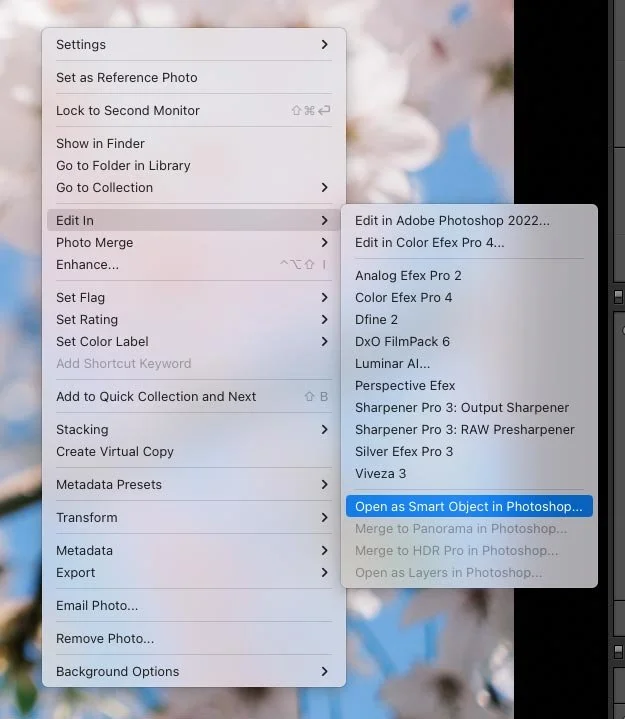
The next step is to send your image to Photoshop as a smart object. This is important as you want to preserve the edits so that they’ll load into camera raw. Once the image has loaded in Photoshop double click on the layer in the layers palette and this should open camera raw. Now navigate to the presets tab and then option+click (or alt+click on PC) to open the Create Profile option. Here you can accept the defaults and give your new preset a name. Once you save it all you have to do is restart Lightroom for the new profile to show up there.
If you want to download this profile and try it yourself, you can download it using the button below. You should be able to import this into Lightroom by using the option to import presets and selecting the Zip file (not the decompressed XMP), but if that doesn’t work, just google how to import profiles into Lightroom.
You can do this for any of the profiles, and it doesn’t actually have to even be for a Fuji camera. You can actually use any Lightroom adjustment for this method, but be aware that the more you apply in the profile, the less that you will subsequently be able to use in Lightroom after you have applied the profile. For example, say you added a clarity value of 100, then saved this as part of the profile, then you would no longer be able to add clarity if you use this profile in Lightroom. If you’re not sure what I mean then try it and you’ll see! Basically the Lightroom values are absolute for the most part, so if you’ve included them in a profile, then you can’t further adjust them back in Lightroom. That’s why it’s important to keep you adjustments subtle when creating profiles using this method.
Help Support the Blog
Buy from our affiliates
If you want to help support our blog, you can do so if you buy anything from our affiliate partners:
- Nik Collection from DXO Labs
- DXO Photo Lab
- DXO Pure Raw
- My Amazon Photo Recommendations
- My Favourite Mac Utility Application: Clean My Mac X from MacPaw
- If you don’t already have Lightroom, Photoshop or Adobe Creative Cloud, you can sign up here.
If you buy through the above links, we get a small commission, which helps run this site.
Check out my Capture One Style Packs, Lightroom Presets and eBooks
If you’re looking for some Film Effect, or black and White style packs for Capture One, Presets for Lightroom or Photography related eBooks, check out my Gum Road Store.
Buy me a coffee!
If you want to say thanks or help, then you can feed my caffeine habit and buy me a coffee via PayPal with a one off donation to my PayPal tip jar. (Please note that PayPal doesn’t make it easy to respond to these so just know you are thanked in advance)
Join our Facebook Group
If you want to discuss anything you’ve read here on my website, or saw on my youtube channel, or if you want to share images you’ve created using any of my techniques or presets, then I’ve started a new Facebook Group just for that.
Note that this post contains paid affiliate links. We get a small commission for purchases made through these links, which helps run this site.