Improved Fuji X-Trans Rendering in Capture One 12.1
One of the features mentioned in the release notes for the latest version of Capture One is the improved rendering of X-Trans files. I briefly touched on this when I posted about the update last week, but as I was away, I didn’t have access to my main computer to properly show you the changes. So in this post I will go into it in a little more detail.
First off, let me make this clear. The changes are very, very subtle to the naked eye. Many people probably won’t notice it. If you don’t see anything in your images, I really wouldn’t waste your time trying to find it. It fixes some very rare and very specific artefacts, that again, most people won’t notice. I’ve spent a lot of my career analysing images for issues, so it’s something that I’m used to, but for the vast majority of people, this will probably come across as being incredibly nerdy about it. The artefacts are quite small, and you need good eyes to see them.
So what is changed? Well, the update fixes some issues that can occur when there is very fine repetitive detail such as tree branches, leaves, foliage and things like that. These issues were very minor to begin with, and not nearly as noticeable as the same problems in Lightroom for example. If you zoom to 100% on these images you could sometimes see what looked like pixel diffusion on some edges. Again, and I can’t stress this enough, it was very minor. In 12.1 it is gone completely. It’s as if they have improved the anti-aliasing algorithms ever so slightly.
Here are two examples. Again, these are very subtle, so if you don’t see the difference, save your energy and stop writing that hate mail. It is there, you’ll just have to trust me. (I’ll also show you more explicitly a little further down this post.) It’s also really hard to convey the differences by showing small crops on a web page, as you really need to see the full canvas on a monitor with no other distractions. Unfortunately, there’s no other way to show this on a webpage to make it easier to see, so again, you’ll just have to trust me.
Here’s the full image. Please note, this is just for demonstration purpose. I’m using this photo only because it highlights the issue, not because I think it’s a good image (which it isn’t).
Here’s a crop. To see a before and after view better, click on the image to open the Lightbox and then use the left and right arrows to toggle the before and after view.


That’s just the difference that can be seen with the eye. To see what’s fully going on I created a difference map between the before and after version, and enhanced it (adjusting the levels, basically) so you can see how much has actually changed between versions.
The reason I’m showing this is because it’s hard to see what’s going on just by looking at the crops on a web page, so by comparing the two images using this method it is easier to see that there definitely is some processing differences between the new and previous versions.
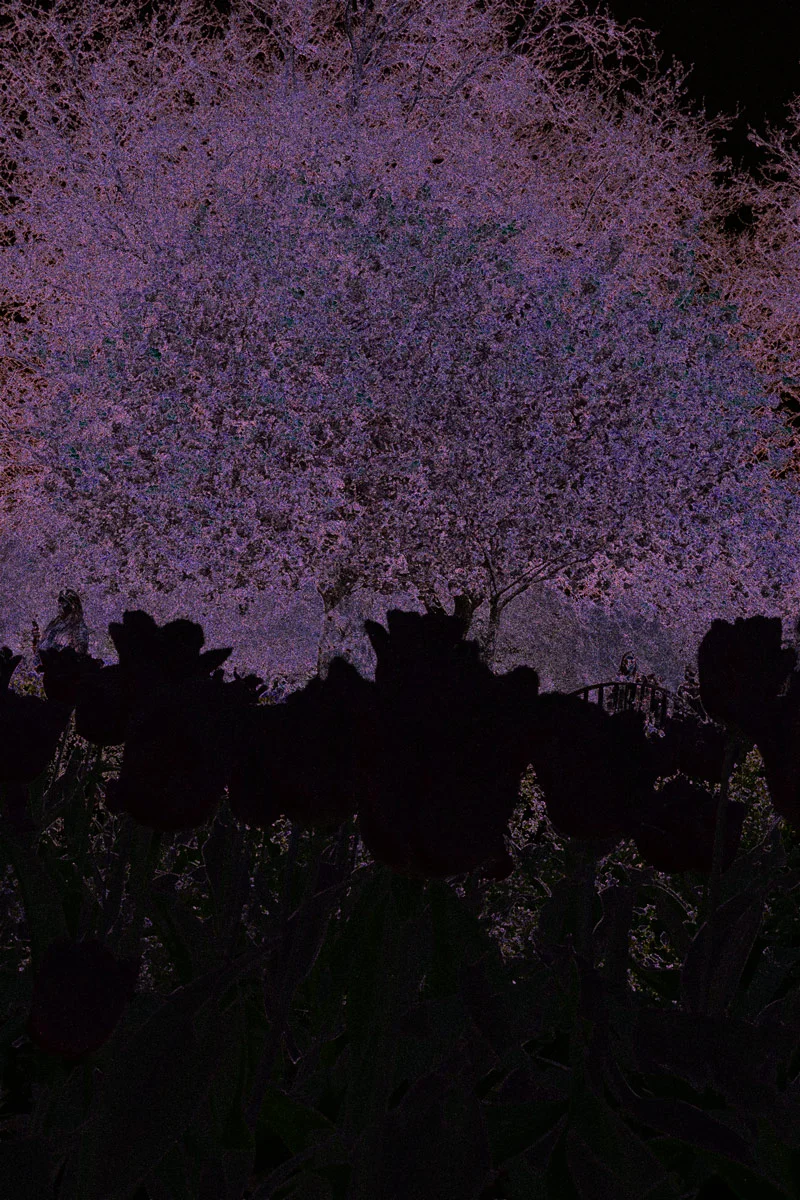
Difference Map - Coloured areas show pixels that are different between the versions.
Here’s another example. First the full image again.
Now, here’s the before and after. Again, click on the image to bring up the lightbox and use the arrows to toggle before and after views. (For some reason whatever Squarespace is doing to this image, it’s hard to see the difference when it’s embedded on the page, but you should see the changes in the foliage)


Here’s another crop. Same instructions (click on the image etc)


And finally, the difference map for this image.

As you can see from the difference map, even though visually the differences are subtle, there is still a lot going on. I have to give Phase One kudos for doing this. It’s something most people probably won’t notice, and they didn’t have to do this, but it pretty much eliminates most rendering artefacts from X-Trans files. In my opinion, while it’s a subtle difference visually, every little helps. If you do a lot of processing, the better quality you start with, the more it will hold up to editing.
Help Support the Blog
This blog is pretty much my day job now and I work to bring you my own take on photography, both tutorials and tips, as well as inspiration from my own art. I support this work, and my YouTube channel entirely either via sales of my eBooks and Lightroom presets, or the kind support of my readers. (I also have some affiliate ads). Running all this isn’t cheap, and so If you like what you see and you want to help keep this all going, there are a number of ways you can do so:
- If you’re interested in buying Capture One but haven’t yet bought your own copy yet, then by going through my affiliate link I’ll get a small commission!
- You can buy any of my Capture One Styles through my online store!
- If you’re buying anything on Amazon, you can help by using my affiliate link: Amazon US or Amazon UK.
- You can support me on Patreon. If you like what I do here and find the information useful, then you can help by subscribing to me on Patreon. As well as helping keep this blog going with even more useful news, tips, tutorials and more, members also get special Patreon only feed, which gives you behind the scenes content, as well as monthly downloads (for the top tier), for only €2 or €5 a month Stop by and check it out.
- Buy me a coffee / Tip Jar. If you want to support the blog but don't want to sign up for Patreon, you can buy me a coffee via PayPal with a one off donation to my PayPal tip jar.
You can see more of my photography and keep up to date by following me on social media and checking out my other websites: