

Working With Capture One and Affinity Photo
One of the questions that I get asked a lot is about using Affinity Photo with Capture One. For those who want to cut the Adobe chord, Affinity Photo is the most popular alternative to Photoshop, and it makes a good companion to Capture One. Even if you still use Lightroom and Photoshop, many still like Affinity Photo for its modern user interface and speed. Round tripping between the applications is fairly straight forward, but there are still a few things to be aware of, which I will cover in this tutorial.
Round-tripping between Capture One and Affinity Photo.
If you want to edit an image you’re working on in Capture One with Affinity Photo, then the process is pretty straight forward. Here’s what to do:
Step 1
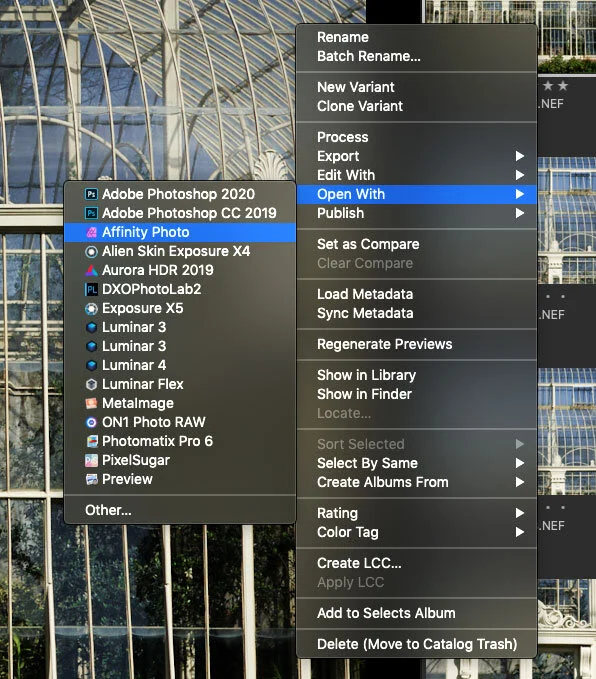
Right click on the image thumbnail in the browser, or if you have the arrow tool selected, right click on the main image and choose Edit With > Affinity Photo.

It’s very important that you choose “Edit With” as opposed to “Open With”.
You can also find this command in the Image menu - which would be Image > Edit With > Affinity Photo.
If for some reason Affinity Photo is not showing up in the sub menu, choose “Other…” and navigate to the application to select it.
Step 2
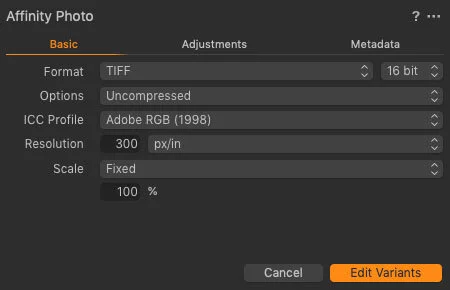
This will bring up a dialog box at the top of the Capture One interface with several options. Most of these can be left as defaults, but the most important one to set is Format. This needs to be Tiff. I also suggest using 16 bit for maximum quality.
While both Capture One and Affinity Photo both support PSD, there can be some data loss when saving as a PSD in Affinity Photo, so the recommended option to use is Tiff.
You can also set the compression to use Zip if you choose, or you can leave it as uncompressed. Here are the options that I use:
Step 3
Once you set the options click on the Edit Variant button. This will now create a Tiff copy of the file that you’re working on, and send it to Affinity Photo.
Step 4
You can now edit your photo in Affinity Photo, doing whatever you want to the image. You can add layers, filters etc. Whatever you wish to do.
Step 5
When you’re finished, choose File > Save or press Command + S (Ctrl + S on a PC) to save. If you added layers or other smart objects, filters etc, this will bring up a dialog box telling you that “This Document Contains Non-pixel Elements” and gives you the option to either Save with Affinity Layers or Save as a new document in the Affinity Photo native format.

In this case you want to choose “Save with Layers” as it will preserve all of your edits and send a layered Tiff back to Capture One. Note that this tiff, may not preserve the layers if you try to open it later in a different application, such as Photoshop, as some of the information may be proprietary to Affinity Photo. However, you should still be able to open the flattened version in other software. You will be able to re-open this in Affinity Photo though, with all of the layers intact.
Step 6
If you switch back to Capture One, you should now see the Tiff file next to the one you sent to Affinity Photo. Sometimes it may take a few seconds to load.
Re-editing your edited image.
Now, if you have edited an image using the method above, and you want to go back and re-edit it at some point, this is where you need to be careful. In this case you need to choose “Open With” instead of “Edit With” in Capture One.
If you choose “Edit With” again, it will make another copy of the Tiff you previously created, and you will loose any of the layers or other objects in your file that you may have created the first time you opened it in Affinity Photo. This is because Capture One can’t read the Affinity Photo layer information, and just reads the composite image that’s stored in the tiff. It uses this to make the copy, and so, you are left with a flattened version. (The original will still be ok though)
So instead, choose Image > Open With > Affinity Photo, or right click and choose Open With > Affinity Photo.
This will then open the file you saved earlier, and all of your layer information should be intact. When you’re finished making your changes, choose Save in Affinity photo and it will save back over the file.
When you switch back to Capture One it may take a few seconds to update the tiff file.
Open a Raw file in Affinity Photo
If you want to send the RAW file to Affinity Photo, rather than the Capture One edited version, then things get a little tricker. It’s important to understand that if you send the RAW file, this means that you will loose any Raw edits that you may have done, and it will use Affinity Photo’s Engine rather than Capture One’s to decode the RAW file. This means that the file may look substantially different when you open it in Affinity Photo this way. There is also no easy round tripping if you do this, and you will have to manually re-import the resulting edited image.
If you still want to do this, here’s what to do…
Step 1
In this case, if you want to send the RAW file, rather than an edited Tiff, then you choose “Open With” instead of “Edit With”. So right click on the image in the browser and choose Open With > Affinity Photo (or select this command from the Image menu) .
Step 2
This will send the RAW file to Affinity Photo. It will open in Affinity Photo’s develop persona. Here you should make whatever changes you wish to make, and then click the Develop button. You can now continue to edit your image in Affinity Photo.

Step 3
When you wish to save, you have a couple of options. If you want to preserve the most amount of data, you should save a native copy in the Affinity format: .afphoto, however this will be incompatible with Capture One. To do this choose File > Save As… and save the file somewhere on your hard drive.
Alternatively, if you want a version that is compatible with CaptureOne, then you can save it as a Tiff with Affinity Layers. To save as a Tiff, you need to actually choose Export rather than save. So, from the menu choose
File > Export…
This will bring up the export dialog. Navigate to the Tiff Tab, and set your options. You can choose to use 16bit if you want and make sure to check the check box for Save Affinity Layers. Click on Export to export the image.

Step 4
If you want the easiest way possible to get the image back into Capture One, then the best option is to save it into the same folder as the RAW file. If you can’t find the folder, then pop back over to Capture One, and right click on the image and choose: Show in Finder (or the Windows equivalent.) This will give you the folder in the Finder (or Windows Explorer) and you can then use this to locate the folder.
Alternatively you can save it to a different location but you will manually need to re-import it into Capture One.
Step 5
Switch back to Capture One. Now, locate the folder in the Folders panel in the Library tab. If you are currently in the import collections (at the top of the library view) you can quickly locate the folder by right clicking on an image and choosing Show in Library.

Right click on the folder in the Library tab, and choose “Synchronize”. This will bring up the Synchronize tab, and it should tell you that there is 1 new image to import. If you don’t want to see the import dialog, make sure that “Show Importer” is unchecked. Then click on the Sync button.

This will new import the file you previously saved from Affinity Photo. Note that this may say that it’s importing all of the rest of the files in the folder, but it’s just scanning them, so don’t worry. It will also probably create a new import collection, with just the newly edited image in it, but to return to the folder, right click on it and choose “Show in Library” which should bring you back to the folder.
If the file doesn’t appear beside the RAW file in the browser, make sure that it’s set to sort by Date. You can select this from the top of the browser when in “Grid” mode (press the G key on the keyboard if using Capture One 20 and then select “Date” from the pop-up menu at the top.
As you can see, editing the RAW file is a lot more complicated, but if you need to do this, for whatever reason, then it is achievable if you use this workflow.
Overall Capture One and Affinity Photo work pretty well together, and sending files back and forward between the applications is pretty straightforward. The thing you have to remember the most is when to use “Open With” and when to use “Edit With”. To help you remember here’s a quick reference:
| What you want to do | Which Command to use |
|---|---|
| Edit Image in Affinity | Edit With |
| Re-Edit Saved Image | Open With |
| Send Raw File | Open With |
Once you have that figured out, there isn’t much to worry about, and it should be sooth sailing!

Just a reminder that Capture One is currently offering a 25% discount on Capture One for Sony or Fujifilm (at the time of writing this). Just use the Code SPRING25 at the checkout. The sale ends on March 31st and is applicable to either the Sony or Fujifilm versions of Capture One, either a subscription or perpetual license. If you don’t already have Capture One, this is a good way to save on the software.
Note that this contains affiliate links. We get a small commission for purchases made through these links, which helps run this site.
Help Support the Blog
Patreon
If you like what you see here and you find this useful, then you can help support this blog and help me keep making great content like this by supporting me on Patreon for as little as $1 a month. There are a number of options available with different rewards, such as behind the scenes content, special Patreon only videos and more. Check out my Patreon Page for more details, and a big thanks to everyone already supporting this blog on Patreon.
Buy me a coffee!
If you’d rather not use Patreon, but still want to say thanks or help, then you can feed my caffeine habit and buy me a coffee via PayPal with a one off donation to my PayPal tip jar.
Lightroom Presets and Capture One Styles
If you use either of these applications, then check out my range of custom made Looks in the form of presets for Lightroom, and Styles for Capture One.
Join our Facebook Group
If you want to discuss anything you’ve read here on my website, or saw on my youtube channel, or if you want to share images you’ve created using any of my techniques or presets, then I’ve started a new Facebook Group just for that.


