Capture One 20 Review: New Features, Improved Tools and More
Capture One 20 has just been released, and the newest version of Phase One’s Photo Editing Software comes with changes to the interface, improved and re-engineered tools, as well as some other improvements and features.
According to the company, many of the changes in Capture One 20 come from user feedback. Here’s what they say in the press release:
The development of this newest iteration of Capture One was geared intently on user feedback from the Capture One community in order to deliver a refined design with new processing capabilities and significant workflow enhancements. There are a host of robust new capabilities, improvements upon the already class-leading suite of features like the powerful Color Editor and Noise Reduction Tool. These developments all stem from user-input and Capture One’s commitment to satisfy requests and deliver beyond.
I’ve been using the beta version for about a month now, and in this article I’ll share my thoughts on what’s changed in the newest release. Before that, here’s a quick summary of the key new and different features in Capture One version 20:
- Improved Noise Reduction
- New Basic colour Editor
- Redesigned High Dynamic Range Tool
- Improved Crop Tool
- “Switch to next” option to automatically move to the next image when culling
- Scrolling Tools
- Copy Layers
- Improved DNG Support
- Changes to toolbar icons and text
- Changes to Default Shortcuts
Some big Interface Changes
When you write the list of new features down in a list it might not look like that big a deal, but they’ve changed quite a few things in the software, and in my opinion, all of these changes are for the better.
Scrolling Tools
The first thing you’ll notice is that the tools now scroll on each tool tab. Whereas before they would just collapse if there wasn’t enough room on the interface, and you would have to open and close tools as you needed, now the whole set of tools will scroll up and down. This is more like the behaviour of Lightroom. In addition, at the top of each tool tab, is an area where you can pin commonly used adjustments so they won’t scroll, but always stay on top of the interface. By default this includes the layers tool.

For example, say you’re on the Exposure tool tab, and you always want to have quick access to the exposure tool, then you can pin it to the top with the layers panel. To do this you just click on the … menu and choose: “Move Tool to Pinned Area”. To remove it again, you just drag it back to the main area.
The scrolling interface took a bit of getting used to at first, because I was so used to the old way of working, but after a while, it makes things much easier, as you’;re not constantly opening and closing panels, especially on a smaller display.
New Keyboard Shortcuts (I called it!)
A little while ago, I wrote a blog post with a suggestion for Lightroom switchers to change the keyboard shortcut for showing and hiding the viewer to “g” to simulate the “grid mode” shortcut on Lightroom. Well, I must have been psychic, because this they have changed this to be the default now in Capture One. Now when you press the G key it will switch between the viewer and the thumbnail grid. This should make life a bit easier for Lightroom switchers.
There are other changes to the default shortcuts too. Shortcuts for zoom, full screen, Focus Mask have also been changed (and there are probably others too).
Improved Crop Tool
The crop tool has now changed, and they’ve made it easier to see the edges. It can also now be constrained by holding down the shift key (if set to unconstrained), and using he alt/option key will constrain it so that it scales from the centre of the current crop rectangle. But the big improvement, that I know a lot of people will appreciate, as its the number one complaint I get from Lightroom switchers, is that you can now rotate within the crop tool.

If you hover the cursor over the corners, outside of the crop rectangle, you can now rotate the image. You can also hold down the command/ctrl key to rotate from anywhere (not just the corners)
I’ve gotten dozens of comments from people overt he years complaining that they couldn’t rotate and crop using the sam tool. Well, now you can. A well deserved “Finally”.
New Basic Colour Editor
The basic tab of the colour editor has also been redesigned. Instead of the colour wheel segments and colour swatches, you now just have swatches arranged horizontally. This makes the tool much more compact, and again, makes it look a little more like Lightroom. However, this isn’t just an aesthetic difference.

There are functional changes too. The range of the Lightness slider is now grater than in the previous version. I had actually made a video before, about how to create polariser effect. I used the advanced tab, because you couldn’t adjust the values enough in the basic editor. Well, that’s obsolete now, because now the range of values you can adjust is higher. For example, in the old version, you could only adjust the lightness slider to a value of minus or plus 10 but now it goes to -+ 50.

You can still adjust the colour range that is affected by each colour by clicking on the little … button located beside the colour selector swatches. This brings up the old interface and allows you to adjust the range for each colour.
But wait, there’s more…
They’ve also added a “direct colour editor” cursor tool. This allows you to make changes to colours by dragging directly on the image. This is kind of similar to the option in Lightroom, but it is implemented differently. You to click and drag anywhere on your image and have colour under change. The direction you drag determine what changes. Left and right changes the hue. Up and down changes the saturation, and holding down Alt/Option and dragging left and right changes the lightness.
There are options that allow you to change which axis of movement does what, and you can also change the sensitivity, meaning that you don’t have to move the curser as far to make changes.
Note that these changes just affect the basic editor, and the advanced and skin tone tabs are still the same.
New High Dynamic Range Tool
The high dynamic range tool in the Exposure Tool Tab has also been given a make over. Again, this follows the pattern here of making things a little more “Lightroom like” but this also addresses another “Finally” and fixes another long held limitation of the software.
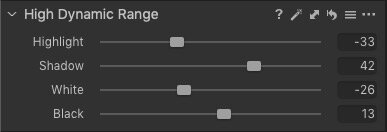
First of all, the shadow and highlights sliders are now centred. You can now add positive or negative values to both of these options. In the old version you could only drag these up. The way these work is now the same as Lightroom, in that you drag down on the highlights slider to recover highlight, and up to increase the highlight brightness. Shadows are the opposite. This means that you can now, finally do a positive highlights adjustment and a negative shadow adjustment.
But they’ve also added two additional sliders to this tool. Drum roll please….
You now finally have a black and white adjustment slider. In the past the only way to adjust the blacks or the whites was either by tweaking the levels tool, or by using the three way colour corrector, but it was never quite right. Finally, you can now do a proper black level and white level adjustment. I know I’m using finally this review a lot, but this is one of those things that really is deserving of a “finally”.
Copy and Apply Layers
Another new feature is that you can now copy and paste individual layers between images. Previously, you could only copy the whole layer set, but now you can select which layers to copy. Additionally, you can now copy layers to images of different dimensions, and applied layers will be added to existing layers, instead of replacing them. On top of this the Layers palette has been redesigned slightly.
New Noise Reduction
The Noise Reduction algorithms have changed, and noise reduction is now improved. Significantly.
According to the information in the release notes:
In Capture One 20, the Noise Reduction Tool has been re-engineered for improved performance. It tackles noise on two fronts: luminance noise and colour noise, while Capture One 20 brings improved recognition of patterns and edges; better colour noise reduction; bigger impacts from the Amount slider, and stronger noise reduction for images shot with a high ISO. Not only does it provide a higher level of noise reduction and detail retention, but also holds colour accuracy.
So what does that actually mean in reality? Well, at high ISO the difference is pretty dramatic. Here’s an example. The original image was shot at ISO 6400 and then pushed two stops in post. This is beyond what would normally be useable, but I wanted a worse case scenario, and this was about the worst I could get. As you can see, there is a pretty significant difference.
And here’s a 100% Crop (Click to view large and see at 1:1 resolution)
But apart from such extreme examples, there are a few other impacts of this. I normally recommend to people to turn off noise reduction at low to mid ISO ranges as it can soften the image slightly, but now, this is much less noticeable, especially with higher megapixel images. So much so, that I will have to re-think my advice on that. According to the release notes, it is “smart” so it applies the appropriate amount based not he ISO and a few other parameters, but I still think it applies too much by default. However, if you have a higher megapixel camera, it’s probably fine now to leave it, especially on 30mp or higher sensors.
Other Minor Changes
There are a few other little things that have changed. The preview quality seems to have improved, especially with vertical images. This isn’t listed in the release notes, but I noticed that the sharpness of vertical or portrait orientation images now no longer seem to appear soft, so you will need to use my work around less. Some things still don’t fully render zoomed out though, so it is still necessary.
DNG file support is now improved, with improved colours for generic DNG files.
A new “Switch to next” option allows you to switch to the next image when doing things like rating, allowing you to speed up your ratings and sorting workflow.
Conclusion
This is a fairly big release, and I’ve probably missed a few things. Overall, in using it for a while now, I’m impressed. I found myself using he word “finally” a lot when writing this review, and many of the changes have that feel to them. The changes to the high dynamic range tool alone are worth it for finally having blacks and whites sliders.
For those wanting to switch to Capture One from Lightroom, this should ease some of the pain points, as a few things will work a little more like you’re used to now, without compromising on any of the abilities of the software. While the more cynical out there could see some of this as pandering to Lightroom switchers, there are real workflow advantages to the new changes, and it makes a big difference, at least in my opinion.
The new noise reduction algorithm is also really impressive, especially at high ISO. It was already pretty good before, but now, it’s pretty amazing.
Overall, it’s a solid upgrade, and I am really happy with the new version. They have really focused on refining and enhancing the software’s core strengths and making the workflow easier and more refined, while improving several core tools. I highly recommend it.
Availability
Capture One 20 is available now, and you can find out more on the company’s website.
You can buy or upgrade to the new version direct from the Capture One store, and this includes the Fuji and Sony versions. You can also try it out with a 30 day trial version.
Compatibility with my Style Packs and eBooks
Just a quick note about my own style packs. I’ve checked and they all work fine in the new version of Capture One. They’re also on sale at the moment too, so if you’re looking for some extra looks for Capture One, check them out here on my store.
My Capture One Fuji Guide will need some amendments for the new version, and I hope to have an update out within the next month or so, but certainly by the end of January at the latest (hopefully before the end of December) this will be a free upgrade to anyone who has already bought the guide.