Two Ways to Automatically Send Images from Lightroom (or Capture One) into Apple Photos
If you’re on a Mac and you want to send your finished images from Lightroom (or Capture One) to Apple Photos, to sync to your devices for example, then you can do it manually by exporting from one application and importing into the other. This can be a bit tedious, but there are also some ways you can automate the process. This involves exporting to a folder in the finder from Lightroom or capture One, and having that automatically import into Photos. There are two ways to set this up.
Method 1: Use Automator
The first method is to use Apple’s own Automator tool. With Automator you can set up an automation on a folder that will run whatever actions you want every time an image is added to the folder. To set this up in Automator here’s what to do:
Step 1
Launch Automator. This will ask you do you want to create a new workflow. Choose “Folder Action” from the available options.
Step 2
This will create a blank action template. Now you just need to add the option to import images into Photos. In the library look for the Photos heading. Once you click on that you’ll get a list of available actions.
Step 3
Choose “Import Files into Photos” to add it to your workflow. Here you can set the option to import without adding to an album or you can set an existing album.
Step 4
At the top of the workflow you’ll see an option to “Choose Folder”. Select the folder that you want to use as a “watched folder”. This will be where you import into.
Step 5
Save your action.
Step 6
You can now test this by exporting images from Lightroom into the folder that you selected, and they should automatically import into Photos, although there can usually be a little delay.
Method 2: Use Hazel
Hazel is a wonderful little utility that I couldn’t live without on my Mac. It allows you to set up a number of watch folders and perform “rules” on them when items are added. It works like the rules in Mail, only instead of acting on emails, it acts on folders. One of the things you can do with it is set it to automatically add items to Photos, and it’s a little easier to set up than Automator. (Automator is free though!)
Here’s what to do: (Assuming you have installed Hazel and have it running).
Step 1
Open Hazel. You can do this from the menu bar if its running, or in your system preferences.
Step 2
In the Folders pane, click on the + button at the bottom to add a folder. Select a folder from the dialog that you want to use as your watched folder.
Step 3
In the Rules pane, click the + button to add a new rule
Step 4
This opens the New Rule sheet. Start by giving it a name in the Name field.
Step 5
We need to set a condition so that this will run. You can set this to anything that will trigger it but I usually set it to Date Added is in the last 1 Week. You could set up more complex rules here if you want but this should suffice.

Step 6
Set the action to “Import into Photos” from the pop-up list. You can also set an album here also if you want. When you’re finished click OK.
This will now scan the folder and anytime you put an image into it it will be added to Photos. This can take a little time to complete, especially if you copy a large number of images into the folder, but it runs in the background and you don’t have to worry about it.
Setting Up Lightroom
Whichever of these methods that you use the next step is to set up Lightroom to make it a bit quicker. You can create a preset to export directly into the folder that you have chosen at the settings that you want, and you can then call it with just a single menu item, and it will do everything else for you.
Here’s what to do:
Step 1
Launch Lightroom
Step 2
Select any image to work with, and then select Export from the File menu.
Step 3
In the export dialog box, set the following options:
- Export To (Top of the interface): Hard Drive
- Export Location > Export To: Specific Folder
- Folder: Click on the choose button to select the folder you are using as your watched folder.
- File Settings: Jpeg. Set the quality to 100% (recommended) and Colour Space to SRGB (this will be most compatible if you intend to use your images with multiple devices)
- Set whatever other options you see fit. If you don’t want to export full resolution JPEGS you can set a size, but I recommend using full res, unless you have a really high megapixel camera.
Step 4
Now you want to save this as a preset. From the preset panel, choose “Add” and give it a name. Something like “Add to Photos”. You can now hit cancel to save your preset without exporting the image (or you can choose ok, if you want to test your workflow)
Step 5
You can now call this from the File > Export With Preset Menu at any time on any image or group of images.
Capture One
You can do the same in Capture One. All you have to do is set up a process recipe that achieves the same results. Create a new recipe that uses Jpeg as the format, and set the folder we chose in the first part of this tutorial as the Output Folder. Here are the settings that I use:
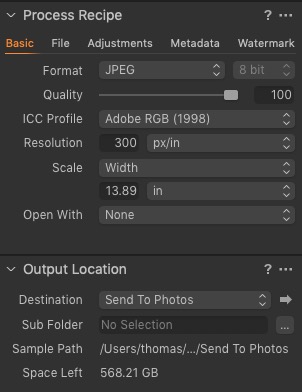


Once you set this up, you can just process images with this recipe and they should go straight to Photos. Obviously this will work with any software, and not just Capture One or Lightroom. All you have to do is save into the right folder to trigger the automation. An you can customise this to do whatever you want, whether that's creating a smaller version, or using tiff instead of Jpeg (not reccomended) and so on.
Help Support the Blog
Buy from our affiliates
If you want to help support our blog, you can do so if you buy anything from our affiliate partners:
- Capture One Pro is available in both subscription and perpetual licences available, in versions for all cameras, Fuji specific , Sony specific or Nikon specific. In addition you can get 10% off the price of any Capture One product by using the following code: TFPHOTO
- Capture One Professional Style Kits from Capture One.
- Luminar AI is available from Skylum Software. Get a 10% discount using the following code: TFP10
- Nik Collection from DXO Labs
- DXO Photo Lab
- DXO Pure Raw
- My Amazon Photo Recommendations
- My Favourite Mac Utility Application: Clean My Mac X from MacPaw
- The VPN I use regularly - Nord VPN - Save on 2 year deal (valid at the time of posting)
If you buy through the above links, we get a small commission, which helps run this site.
Check out my Capture One Style Packs
If you’re looking for some Film Effect, or black and White style packs for Capture One, check out my Capture One styles on my Gum Road Store.
Buy me a coffee!
If you’d rather not use Patreon, but still want to say thanks or help, then you can feed my caffeine habit and buy me a coffee via PayPal with a one off donation to my PayPal tip jar.
Join our Facebook Group
If you want to discuss anything you’ve read here on my website, or saw on my youtube channel, or if you want to share images you’ve created using any of my techniques or presets, then I’ve started a new Facebook Group just for that.
Note that this post contains paid affiliate links. We get a small commission for purchases made through these links, which helps run this site.