

Lightroom Classic 12.3 – More than a point upgrade?
Today Adobe released the latest round of photography product updates, including all the versions of Lightroom, camera raw, etc. For the purposes of this post, I’m going to concentrate on Lightroom Classic 12.3. While this sounds like it should be a minor update given that it’s a point release, it is anything but. This could end up being one of the most substantial updates in years, based on just one of the features in the software. But more on that in a minute.
There are quite a few changes and updates in this release, but for the sake of this post, I’m just going to concentrate on 3 main areas. (And I’m saving the best for last)
1. Mask Updates
The first new set of features are some updates to the masking toolset. The big one is support for curves in the masking tools. This means that you can now use curves on your selective edits. We’ve known this has been coming for a while as it was added to Photoshop Camera Raw a while ago, but it’s good to see this finally arrive in Lightroom.
With the addition of curves, the only other major adjustments now lacking from masks are colour grading and colour controls. Perhaps in a future update they will be added. People have been asking for the ability to do curves on masked sections for a long time, though, so this will be a welcome update.
One thing to note about this is that the curves, when used on a mask, is that the histogram shown in the curve only represents the masked area. It’s not a full histogram, as shown in the main masking panel.
There are also two new additions to the people masking options. You can now create masks for facial hair and clothes.
2. UI Updates
There have been some user interface updates, and one that, while quite minor in the grand scheme of things, might confuse people at first. When you launch the new version of Lightroom for the first time, you might notice that the switches on the panels have been replaced by eyeball icons. This is now the default state.
Clicking and holding on an eyeball icon will temporarily disable the edits in the panel, and releasing the mouse will re-enable the edits.
If you want to convert these to switches like in previous versions, just hold down the alt/option key and the eyeballs will turn to switches. This allows you to turn off an edit panel, rather than just temporarily hiding it.
It should also be noted that the eyeballs act as edit indicators for a specific adjustment panel. If you’ve made no changes to a panel, then the eyeball will be greyed out, indicating that said panel has had no changes made to it.
I’m sure some people will be annoyed by this change because people don’t like changes, but it actually makes more sense once you’ve used it for a while. 90% of the time when I used the switch on a panel, it was to temporarily disable the edits for a before/after look at just the adjustments in a specific panel.
3. AI Denoise
OK, time for the main event. The noise reduction technology was getting a little stale in Lightroom, let's face it. It hasn’t been updated for a long time, and other applications arguably did a better job in this regard. However, with Lightroom 12.3 Adobe has made a giant step forward, albeit in a slightly different way than perhaps people were expecting.
Lightroom 12.3 adds AI based denoising, and the results are nothing short of amazing (in my opinion). Because it’s using AI, it’s not a real-time process, and as such, uses the Enhance function (the same one that does super resolution) to create a new denoised DNG file. The result looks like you took a squeegee and wiped all the noise off the image. It’s kind of amazing.
The first time I used it, I actually said “wow” out loud. And some more salty words I won’t use here. It’s not perfect, and occasionally, it can create weird results in fine textures if the source is very noisy, but most of the time, it’s pretty impressive.
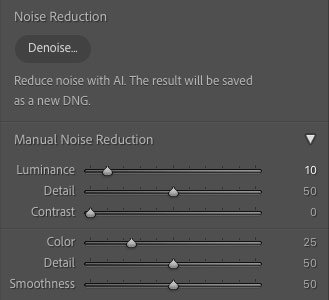
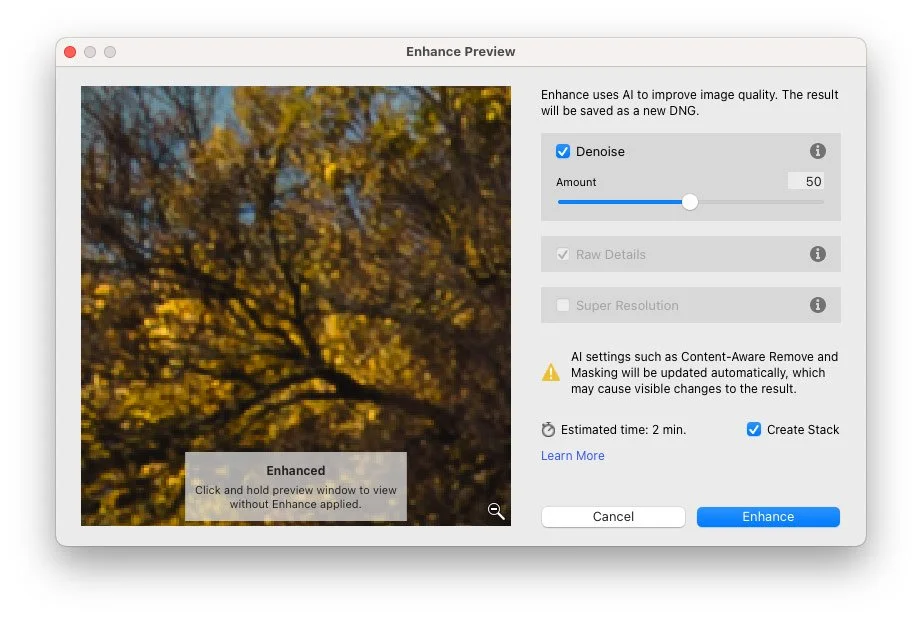
To use the feature, either choose “Enhance” from the “photo” menu, or scroll down to the noise reduction section of the adjustments panel in the develop module and click on the denoise button. This will open the Enhance panel. From here, you can select the denoise option and decide an amount.
There are some limitations here. For a start, you can’t use the new AI Denoise in conjunction with Super Resolution yet. You can’t use it on files you’ve already processed with enhance. It’s also limited to Bayer and X-Trans files. So Raw or DNG files only. It can’t be used with Jpegs, or Apple’s ProRaw, for example. Images that use the enhance function now have a little badge in the filmstrip.
It’s also quite slow to process, taking about 2 minutes an image on my M1 MacBook Pro, but the results are kind of amazing.
Click to view larger
Click to view larger
If this sounds a bit like DXO Pure Raw, then that’s because it is very similar in concept, however the results are quite different in my opinion. DXO produces images that are sharper, but not as clean. On the other hand, Lightroom’s images are very natural, and depending on the setting, almost noise free but not as sharp. DXO Pure Raw is also much, much faster.
I will do a direct comparison of the two applications in a separate post / video soon.
Additional Features
There are some additional features in this release, and of course, the usual round of new camera and lens support. Here are some of the other changes and improvements in Lightroom 12.3
- You can now choose which version of Photoshop to use when editing with Photoshop
- You can now send multiple images to Photoshop as smart object layers
- Library Performance is improved
- All views in the develop module are now GPU enhanced (not sure what this means)
For more details, see the official release on the Adobe Website
Help Support the Blog
Buy from our affiliates
If you want to help support our blog, you can do so if you buy anything from our affiliate partners:
If you buy through the above links, we get a small commission, which helps run this site.
Check out my Capture One Style Packs, Lightroom Presets and eBooks
If you’re looking for some Film Effect, or black and White style packs for Capture One, Presets for Lightroom or Photography related eBooks, check out my Gum Road Store.
Buy me a coffee!
If you want to say thanks or help, then you can feed my caffeine habit and buy me a coffee via PayPal with a one off donation to my PayPal tip jar. (Please note that PayPal doesn’t make it easy to respond to these so just know you are thanked in advance)
Join our Facebook Group
If you want to discuss anything you’ve read here on my website, or saw on my youtube channel, or if you want to share images you’ve created using any of my techniques or presets, then I’ve started a new Facebook Group just for that.
Note that this post contains paid affiliate links. We get a small commission for purchases made through these links, which helps run this site.


