

Frame Photos for Instagram using Lightroom’s Print Module
If you post on Instagram, I’m sure you’ve come across the problem of getting your images to fit within the Instagram aspect ration. Instagram uses 5X4 (or 4X5) as the ratio for images posted to the platform, but most cameras shoot 6X4. There are many ways around this, such as cropping to the right ratio and making special instagram versions. Another popular option is to fame your image in its default format inside a white frame that fits on Instagram. This is quite common, and I recently got a question from a reader asking if there was a way to do this from within Lightroom. There is, and it involves using the Print Module.
The print module is actually a basic layout tool inside of Lightroom, and it has one very useful feature that can often be overlooked: the ability to print to a file. This way you can use the Lightroom Print Module to lay out your images within a frame, and then save to a Jpeg file that you can use elsewhere, or even re-import back into Lightroom if you want.
For the purposes of Instagram, You can use the print module to create a 5X4 frame and have your image fit within that. It’s actually quite easy, but just involves a little bit of setup first. Here’s what to do:
Part 1: Setup
Step1
The first thing you need to do is set up a custom page size. Go to the print module and at the bottom left of the screen, click on Page Setup.
Step 2
Now we need to create a custom page size. You don’t actually need to have a printer attached for this to work. The example I’m using here is on a Mac, and so the layout of the dialog boxes might be a little different on Windows, but the tools should be the same.
Step 3

In the Page Setup box Select the Page Size Pop-Up menu and Then Choose Manage Custom Sizes…
Step 4
Use the Plus button at the bottom of the dialog to create a new custom size (again, the interface or this may be different on Windows) - you need to do this BEFORE entering the dimensions (or it will loose them)
Step 5
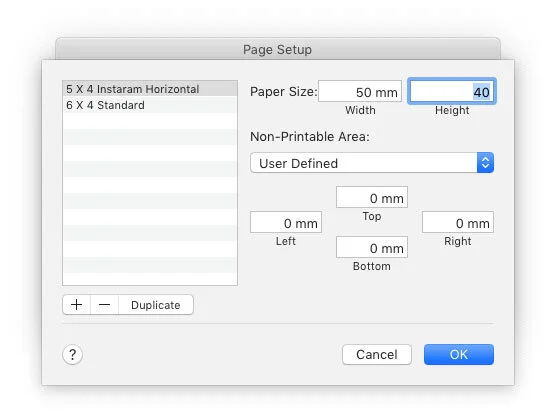
Now we need to create a custom page size with a 4 X 5 aspect ratio. Because we use the metric system here in Ireland, my options default to mm. I created a page size of 50mm X 40mm. Set the Non-Printable area to user defined, and then set the margins all to zero. See the screenshot below.
Step 6
Click OK to exit, and now in the Page Set up box you can select either landscape or portrait orientation. You will need to repeat the rest of this procedure to create one of each. For the moment we will stick with portrait orientation (as we made our image 50 X 40, it will actually be horizontal anyway). Click ok to exit the dialog
Step 7
In the print dialog you should now have a 5X4 frame with the image probably filling the width of the frame. You now need to set a few more settings from the settings on the right hand side of the screen.
Under Image Settings, Make sure Zoom to fill is off. You can leave rotate to fit on or off, it doesn’t matter.

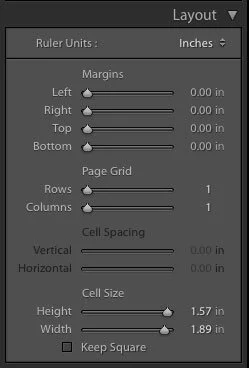
Under Layout, set all the margins to zero. If you want a small margin, then set the Cell Size to be slightly smaller than the full size. You will have to judge this visually.
Under Print Job, set “Print To:”to Print to File. Set File Resolution to 900ppi. This is based on using the dimension I set above. You could use any dimensions really, so long as the aspect ratio is correct. For example if you used 500mm X 400mm then you could use a smaller ppi. You may need to experiment to make sure the resulting resolution is high enough, but for 50mm X 40mm, 900ppi will work fine.
I also have Print Sharpening set to Low, but this is optional. You can change the Jpeg Quality if you want, but I leave this to 100, as Instagram will re-compress it anyway, and I want the best quality.

Step 8
You should now save these as a template. From the Template Browser (on the left hand side of the print module) click the + button to create a new template. (You can also create a new group if you want), and call it something like Instagram Horizontal. You should then repeat these steps but change the orientation in the Page Setup dialog to create a vertical oriented template and save that too.
Part 2 - In use
Now all you gave to do is select an image that you want to export, and then select the correct template. You should get a preview in the print module, and then just select “Print to File” from the bottom right of the interface to export.
You can actually export multiple images at once using this technique. Just shift select them from the film strip at the bottom of the print module (or select them in the library before switching to the print module). Just remember that you will have to select differently oriented image separately and use the other template.
That’s pretty much all there is to this. It looks complicated when written out in a list of instructions like this, but it’s actually simple enough to do, and once you have the templates set up its a cinch. You can also customise this to your hearts content. You can add a bigger or smaller border, or just create a single square template. You can also ad a watermark if you want.
Here are some examples of this in action…
By the way, I know not everyone likes using this method in Instagram, and personally, I normally just crop the image to the right ratio, but some people prefer the framed method too, and I was directly asked about it, which is why I’m posting this tutorial.
Help Support the Blog
Patreon
If you like what you see here and you find this useful, then you can help support this blog and help me keep making great content like this by supporting me on Patreon for as little as $1 a month. There are a number of options available with different rewards, such as behind the scenes content, special Patreon only videos and more. Check out my Patreon Page for more details, and a big thanks to everyone already supporting this blog on Patreon.
Buy me a coffee!
If you’d rather not use Patreon, but still want to say thanks or help, then you can feed my caffeine habit and buy me a coffee via PayPal with a one off donation to my PayPal tip jar.
Lightroom Presets and Capture One Styles
If you use either of these applications, then check out my range of custom made Looks in the form of presets for Lightroom, and Styles for Capture One.
Join our Facebook Group
If you want to discuss anything you’ve read here on my website, or saw on my youtube channel, or if you want to share images you’ve created using any of my techniques or presets, then I’ve started a new Facebook Group just for that.
Note that this post contains paid affiliate links. We get a small commission for purchases made through these links, which helps run this site.


