Capture One Terminology Basics for Lightroom Switchers
One of the things I most often hear from people switching from Lightroom to Capture One, is that they find the interface confusing or that there is a steep learning curve. The interface in Capture One is different to Lightroom, of that there is no doubt, but once you get the hang of it you will realise it’s actually not massively different. In this post, I’m going to discuss some of the Capture One terminology and where relevant, how it compares to its Lightroom counterparts.
This is just going to cover the absolute basics. I will go into more details in future posts.
Interface Basics
At the very top of the interface, where you see the first set of icons across the top, this is called the Toolbar. The main set of icons in the centre of this is called the Cursor Controls. There is nothing really similar to this in Lightroom, so it’s more like the tools in Photoshop. Some of these tools have a little arrow beside them indicating that there are pop-outs with more sub tools, again similar to Photoshop.
Down the left hand side are where the main adjustments and controls exist. These are broken into tabbed sections, and the icons for each section are across the top. The official name for these is Tool Tabs. In some respects these are kind of like Lightroom’s modules, although its not the same, as there are no modules in Capture One. All of the functions are active all of the time, unlike Lightroom, which only activates certain functions depending on which module you are in.
You can add or remove Tool Tabs by right clicking on the tool tab bar and choosing Add Tool Tab or Remove Tool Tab. This requires the Pro version of Capture One.
On each Tool Tab there are controls and adjustments broken down into panels. In Lightroom these are most commonly referred to as panels, but in Capture One they are called “Tools” (which is why the tabs are called “Tool Tabs”). If you have the Pro version of Capture One you can customise the tools on any tool tab by right clicking anywhere on the tool interface and choosing “Add tool”.
Tool Controls
On the top right of each tool there is a common set of icons which exists on most tools. These are as follows:
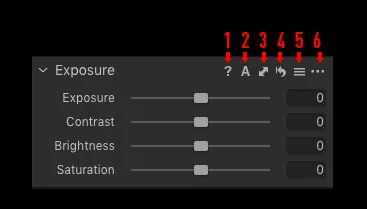
- Question mark: Accesses the help for that section
- The A Icon: This applies automatic settings for this tool.
- The Double headed arrow: Copies and applies the settings for this tool
- The Curley Arrow: This is the reset button for this tool. Hold down the option key and click and hold on this to see a before and after view for this tool. In other words, you can temporarily disable it.
- The Preset Menu: This is where you can find the presets for this tool, and the option to load and save presets
- The … icon is the action menu: This contains options to save the settings as default for this tool as well as the option to remove the tool from the interface.
Browser
On the right hand side of the interface, if you’re using the default layout is the film stip. This is similar to Lightroom’s film strip only it is vertical. The official name for this is the “Browser”.
You can show and hide this with the keyboard shortcut Command + B (Command = Ctrl on a PC). You can also change the position from the side to the bottom by using the keyboard shortcut Command + Shift + B. To bring the browser full screen, in other words, to mimic Lightroom’s grid view, you do this by hiding the Viewer, which is the main image view. To hide and show the viewer it is Command + Option + V. You can also access these options from the View menu.
One other important difference in terminology is the use of the term Presets and Styles. In Lightroom, you’re probably used to the term “Presets” to refer to Develop module Presets. In Capture One, the term Preset is actually used for something else. What you know as presets in Lightroom, are called “Styles” in Capture One.
Styles are a collection of settings that can control multiple adjustments at once. In other words, applying a Style will set lots of different parameters on your image. This is basically the same as a Lightroom Preset.
Presets, on the other hand, are settings for individual tools, and can be found on the preset menu on each tool.
Conclusion
This is just scratching the surface. I’m planning on doing a series of posts for Lightroom users, so if there is anything you have trouble understanding or have questions about, please let me know.
If you’re a Fuji shooter, don’t forget my new Capture One Fuji guide is now out and is on sale for the rest of July. You can learn more over on my Digital Download store. (Yes, this is a shameless plug!)
If you don’t already have Capture One, at the time of writing this they are having a sale on the Fuji and Sony versions of the software, with up to 50% off. This is ending at the end of August 2019 so if you are considering getting the software, this is a pretty good deal. There’s reductions on some of the bundles too on the non camera specific version.
As an affiliate partner, I get a small commission if you buy from the links above too, so if you want to support the blog, and you’re planning on getting Capture One anyway, then check out their summer offers!
Help support the blog
You can see more of my photography and keep up to date by following me on social media and checking out my other websites:
- My YouTube Channel
- My Portfolio
- My Streets of Dublin Project
- Follow me on Twitter
- Follow me on Instagram
- My Facebook Page
- My Patreon Page
I also have a number of digital products available for sale:
- LUTs (For Video and Still Applications)
- Lightroom Presets
- Fuji X-Trans Processing Guides
- Sony A6000 Guide
- Photo Textures
The Gear I use Regularly
- Camera: Fuji X-Pro 2
- Camera: Sony A6000
- My Favourite Nikon Lens: Nikkor 28-300mm
- Vlogging Camera: Canon G7X Mark II
- Screencasting Microphone: Blue Yeti