

Lightroom 7.3 - The big and little changes
I briefly covered the recent 7.3 version of Lightroom which was released during the week on the day it was released, and since then, I’ve had a chance to dig a little deeper. The update has delivered some substantial changes to the software, including some big under the hood changes.
Profiles
By now you’ve probably read about the new profiles architecture in Lightroom. Adobe has re-worked what was previously the camera calibration profiles into a whole new “profiles” section, which is now at the top of the interface. This is in two parts. The first is RAW profiles which are similar to the older version. The second is creative profiles, which are to all intents and purposes LUTS, although not exactly, but more on that in a minute.
For RAW files, Adobe has added a new range of its own profiles. The new default is Adobe colour, which they claim is much better than the previous “Adobe Standard”. There are also versions for “Landscape”, “Vivid” and so on. If you are upgrading to the new version of Lightroom, existing images will keep the old Adobe standard profile, but new imports will now have “Adobe Colour” set as the default.
Having tested it out, I can say with confidence that the new colour profiles are much better than the old Adobe standard. I previously never used that, but always changed to the camera profiles that matched whatever camera I was using. The new version though is much more usable. The idea behind these is that they will provide similar results across cameras, which is useful if you’re mixing and matching different cameras in a project.
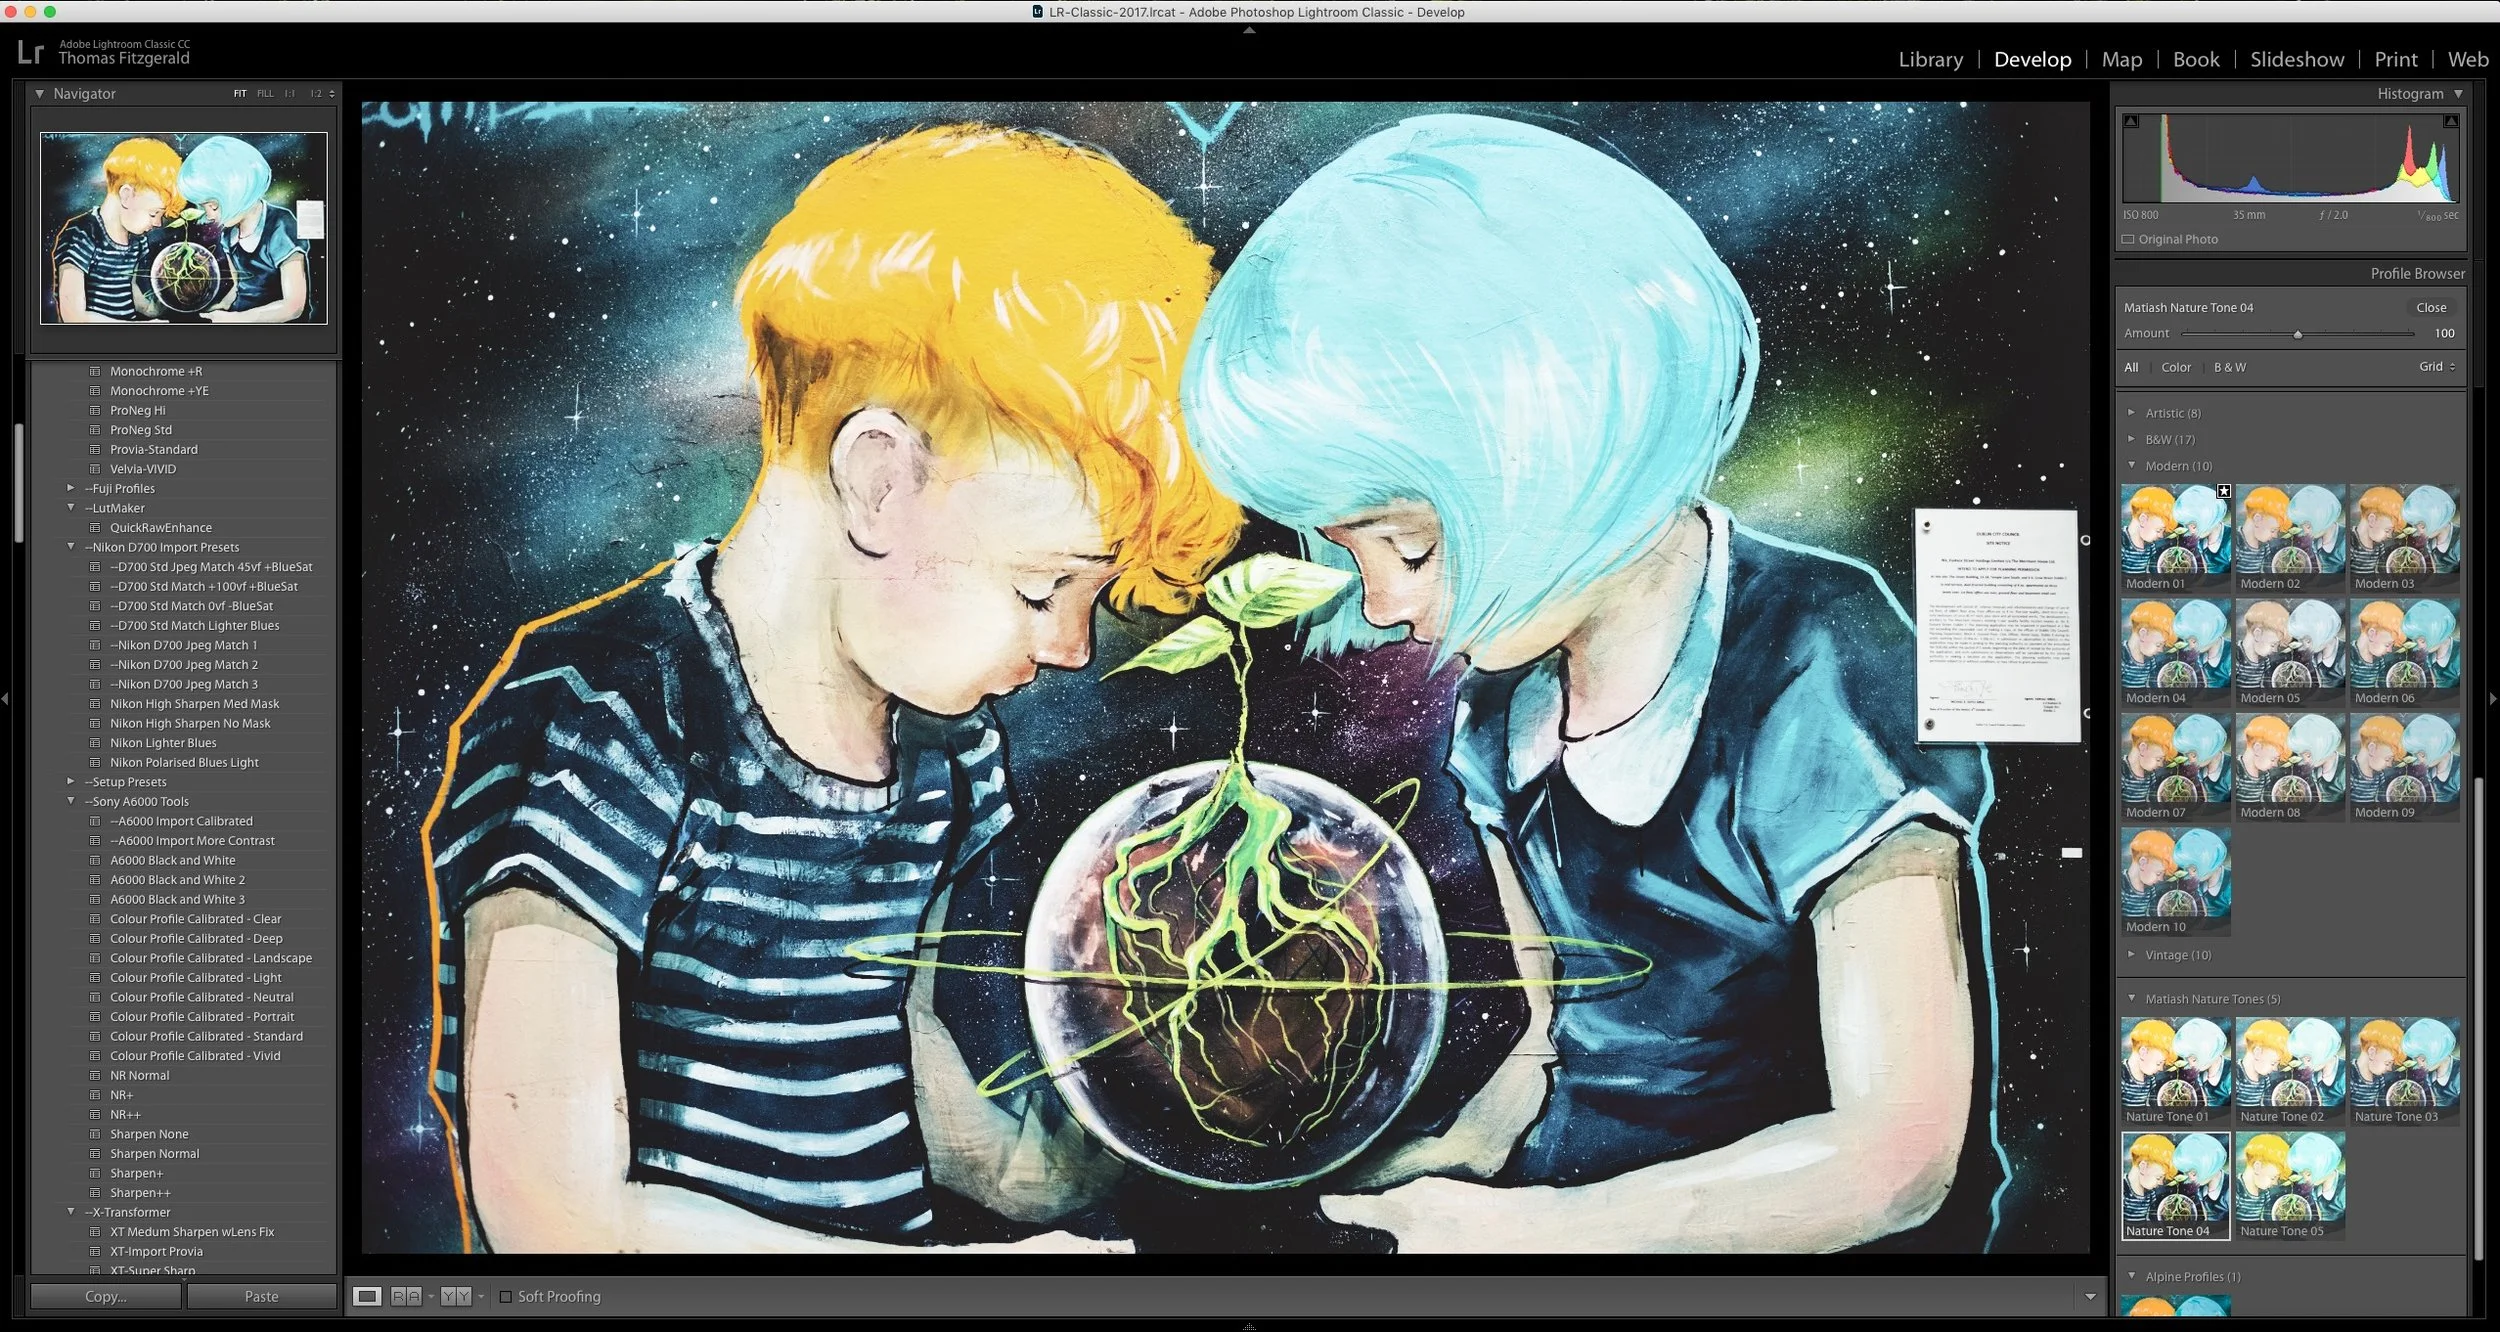
The camera matching profiles are still there, but they’re buried somewhat in the new interface. When you click on the profile pop-up the only profiles that appear in the list are the new adobe ones. To get to the others you need to click on the browse button. This opens up the new profile browser, where you will find all the currently installed profiles, including legacy ones, as well as the new “Creative Profiles”.
As mentioned earlier, these are essentially LUTs, but the format is slightly different. They use the same file format as the new presets, but can contain different information. You can create them from presets using a special technique in Photoshop, but they can only contain certain adjustments. You can also create them using LUTs, but you can’t just load LUTs into Lightroom. They need to be in the special format, and again, you can do this in Photoshop, although it’s a bit of an unintuitive process at the moment.
When you apply a creative profile, you get a slider to control the amount of it, much like the LUT mapping filter in Luminar. However, one downside is that you can’t apply both a RAW profile and a creative profile. It must be one or the other. Having said that, when creating profiles, as far as I can tell, they must include a raw profile in them.
Some people have been complaining about this already (of course they have), calling it the instagramification of Lightroom, but I really like this idea. It offers an interesting way of applying a look, while still keeping your other controls set at zero for further manipulation. The ability to control the amount too is useful, and this is something that people have wanted to do with presets (you can with a plug-in, but it’s iffy). Incidentally, presets can contain these creative profiles, which opens up some interesting possibilities.
Presets
The second major change to Lightroom comes from the develop module preset system. Adobe has re-worked the whole architecture of this, and it’s now better in many ways, although there are a few bugs in it.
The old system was problematic, in that if you had a lot of presets installed, the system could slow down. I don’t think Adobe ever expected that presets would take off the way they did. If you’ve already updated to 7.3 then you probably noticed your presets going through an update process.
The file format has changed from the old .lrtemplate format. The new format is XMP based, which makes sense as it’s a better industry standard. The system also now shares presets between Lightroom and Photoshop camera raw. Digging around in the new file format, there are a few interesting things that you can do with the new presets too. For a start, the new “Creative Profiles” use the same file format and they’re installed in the same place.
The system also now looks like it will use metadata for sorting going forward, rather than folders in the file system. Information for preset “Groups” can be part of the XMP file, and the name of the preset is coded into the XMP file, so it now takes it from this rather than the file name. There are a few other changes in the new format and I’m still looking into it. It should be much more flexible going forward, but there have been some bugs.
Apparently, during the upgrade process, some adjustments get garbled. There is also an issue with sorting presets, as some people have pointed out that it no longer seems to go in alphabetical order. I suspect that this might have to do with the names not being set in the preset code, but rather by the file name.
The other big change is that you now get full-screen previews of presets. Before you were limited to the little window in the navigator, but now you can see what they look like properly. This is very similar to how Capture One works with presets.
The new XMP presets are now stored in a different location too, and Camera RAW in Photoshop now uses the same presets as Lightroom. This means that if you create a preset in one, it will be available in the other and vice-versa. It also means that Photoshop Camera RAW no longer just has a flat list of presets, but is finally organised into groups.
New Defaults and Other Changes
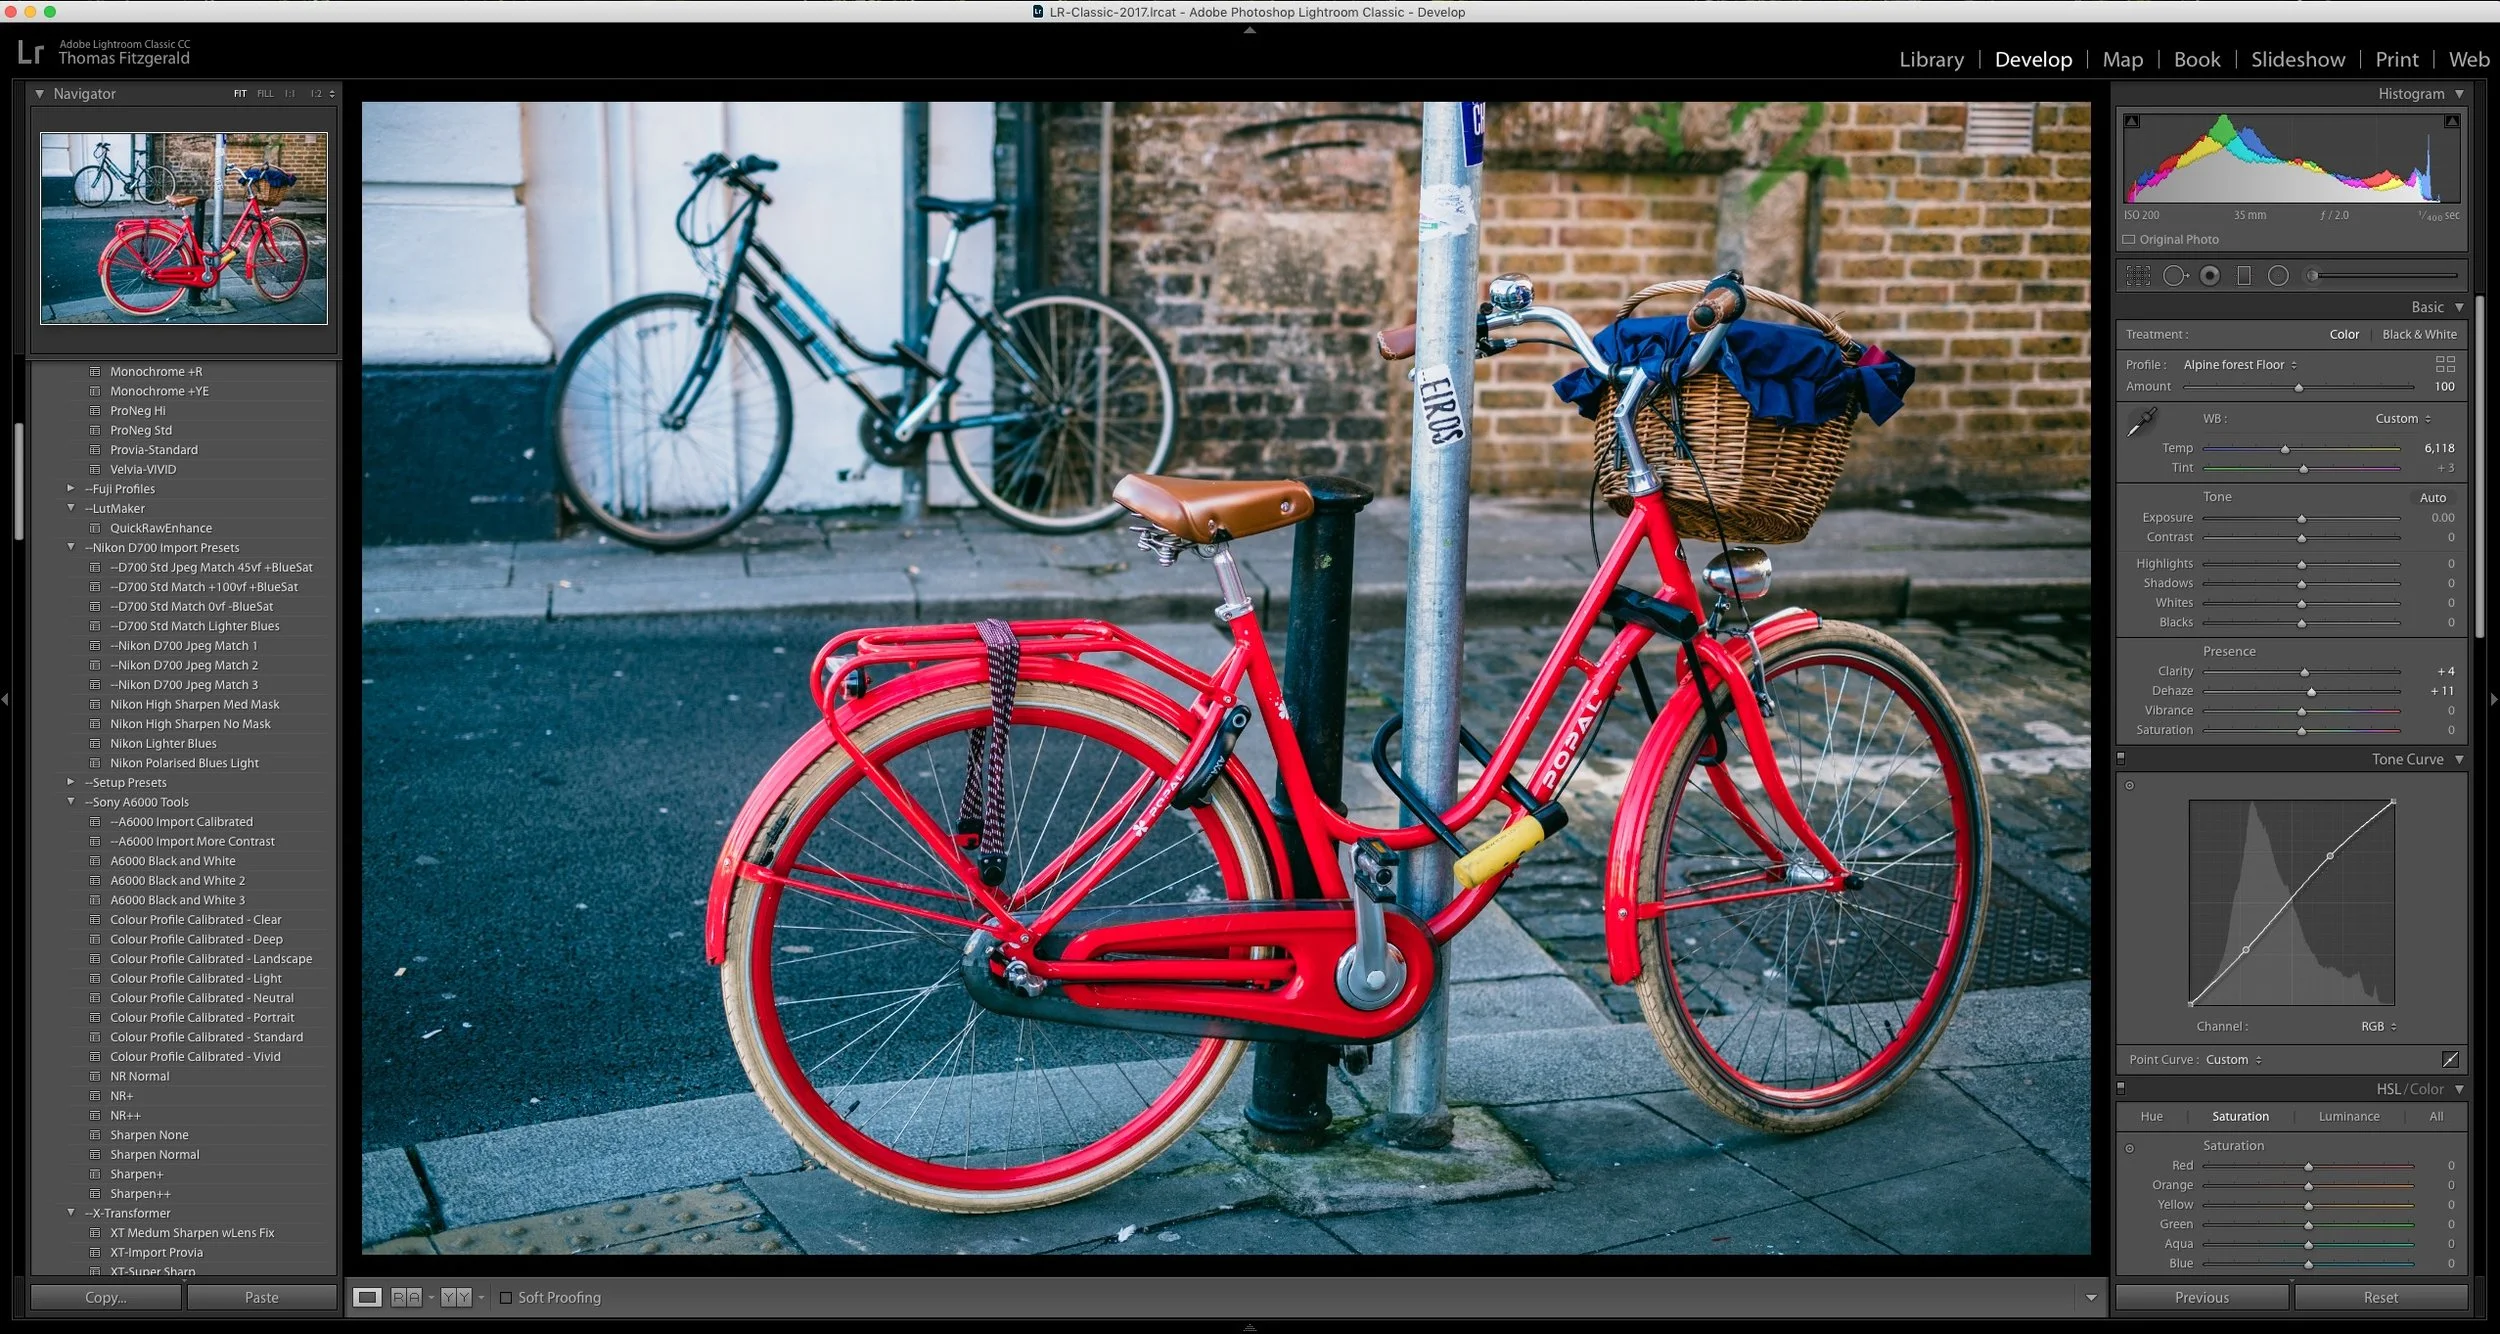
When importing images into Lightroom 7.3 for the first time (i.e. they weren’t part of an upgraded Library) you’ll notice a few things are different. First of all, the colour profile now defaults to “Adobe Colour” rather than the older “Adobe Standard”.
Secondly, and this one took me by surprise, they’ve changed the default sharpening amount from 25 to 40. I’m not sure what the thinking was behind this, but I’m guessing they were tired of everyone saying that Capture One was sharper. It’s fine for most images, although it does bring up the inherent noise a bit more. For Fuji X-Trans files it exaggerates the artefacts due to the demosaicing process, and is too much in my opinion, especially without tweaking the other values. But that’s just my opinion.
There were a few other things listed in the release notes, but the most prominent of which is that the point curve is now larger and more responsive. This always used to drive me mad about Lightroom, so it’s good to see that it's improved, but I would prefer it to be bigger still, and actually will the with of the panel when you increase the size of it.
The dehaze slider has also been moved to the basics panel which makes sense. I use dehaze all the time as a creative tool, and it makes a lot of sense to me for it to be here rather than buried in the effects panel.
Performance seems to be improved a little too, and I’ve noticed that the develop module seems a bit more responsive on my system, but I’ve heard some people complaining about a slow down, so I’m not sure that this isn’t just my enthusiasm getting the better of me.
Help Support the Blog
I’m now on Patreon. If you like what I do here and find the information useful, then you can help by supporting me on Patreon. As well as helping keep this blog going with even more useful news, tips, tutorials and more, members also get special Patreon only perks. Stop by and check it out.
If you like this post then you can see more of my work on Instagram, Twitter and Facebook. I also have a YouTube channel that you might like. You should also check out my other Photography Project: The Streets of Dublin. If you want to get regular updates, and notices of occasional special offers, and discounts from my store, then please sign up for the Newsletter.
You can also show support by buying something from my from my Digital Download Store where I have Lightroom Presets, and e-books available for download. If you're a Fuji X-Trans shooter and Lightroom user, check out my guide to post processing X-Trans files in Lightroom. I also have a guides for processing X-Trans files in Capture One and Iridient Developer. For Sony Alpha shooters I have a new guide with tips on how to get the best from processing your A6000 Images in Lightroom.


